Browse by category
DRILL OVERVIEW
Phil Mickelson Move Drill: Let the Release Flow
Your drill at a glance
This drill is from the Golf Practice Made Fun App.
Step 1. Watch the release
Notice where the hands are when the shaft approaches parallel to the ground on the downswing. Then watch the club move through impact and into the follow-through.
Step 2. Rehearse from your trail thigh
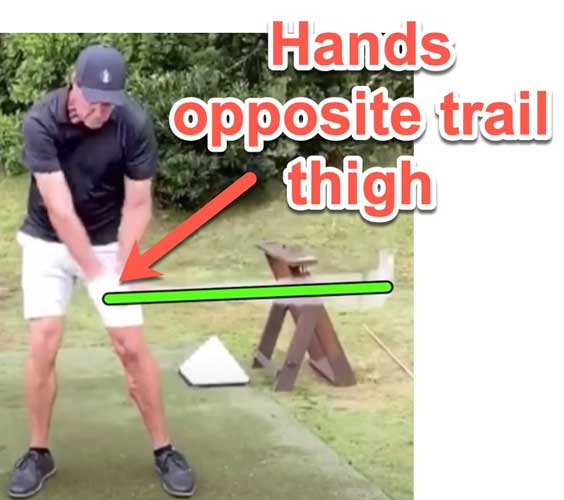
Make a slow backswing, then move down until the shaft is roughly parallel to the ground. Use the photograph to explore the hands being approximately opposite your trail thigh, rather than held back behind your hips.
For a right-handed golfer, the trail thigh is the right thigh. For a left-handed golfer, it is the left thigh. Phil is left-handed, so mirror the movement if you play right-handed.
Notice the difference

Use a slow rehearsal or a mirror to compare the positions. Treat them as checkpoints to explore; camera angle and swing differences affect what you see. Avoid pulling the handle into place or trying to hold a pose during a full-speed swing.
Move through impact

From the trail-thigh rehearsal, keep turning and let the club swing through the ball position. Notice the relationship between Phil’s lead arm and the shaft around impact. Use it as a visual reference, rather than trying to freeze the club into a straight line.
Let the release continue
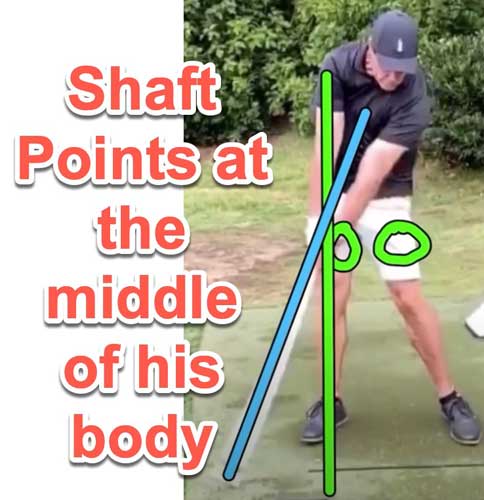
After impact, let the club continue moving as your chest turns towards the target. The feel is “Turn through and let it go.” Keep both hands on the grip; “let it go” means allowing the swing to flow.
| Checkpoint | One simple cue |
|---|---|
| Downswing rehearsal | Hands near the trail thigh. |
| Through impact | Keep turning and let the club swing. |
| Follow-through | Finish comfortably in balance. |
Begin with small swings. If you feel yourself forcing the wrists or losing balance, slow down and shorten the movement.
Step 3. Complete 18 practice repetitions

Complete 18 controlled repetitions. Each repetition is one slow trail-thigh rehearsal followed by one small, flowing swing. Reset your setup before starting the next repetition.
At home, complete both movements without a ball. At the range, make the second movement an easy shot towards the same target. Count the rehearsal-and-swing pair once.
If you’re using the Golf Practice Made Fun App, tick one box in your Practice Round after each completed repetition. These are 18 drill repetitions, not 18 holes on a golf course.
Add one short note about how freely the club swung through or how balanced your finish felt. Your target is 18 repetitions completed.
| Round | What to do |
|---|---|
| First nine | Complete nine repetitions, each pairing one slow trail-thigh rehearsal with one small, flowing swing. |
| Second nine | Pause, then repeat nine pairs. Count the rehearsal-and-swing pair once. |
| Record | Record repetitions completed out of 18 and one note about release or balanced finish. |
George’s Conclusion
Use the photographs to understand the movement, then keep the practice simple: a slow rehearsal, an easy swing and a balanced finish. Let the release flow with your turn. Eighteen repetitions give you a clear task to repeat next time.
Explore another relaxed-swing cue with the Loose Arms Golf Drill.
MAKE THE NEXT BUCKET COUNT
Pick a card. Practise with purpose.